…with your own domain not hosted in Amazon Route 53 and a wild card certificate.
A main premise I follow when it comes to deploying or architecting any service in the cloud, whatever vendor I use, is full encryption between layers and intent to add elasticity on each service (adding them to what AWS calls Auto Scaling Groups).
For a pretty cool new project (wink wink) that we are working in the Security Operations Group at Alfresco, we need to deploy a bunch of AWS resources and we want to use https between all the services. Since we will use AutoScaling groups and ELB, we want to configure all ELB with HTTPS and to do so we have to provide the certificates. We can do that manually or automated with CloudFormation, and the CloudFormation option is what we have chosen as in many other projects. We also want to use our own certificates.
This article is to show you how to create your own wild card certificate with AWS Certificate Manager and use Route53 for a subdomain that you own. For example, if you have a domain that is not hosted in Route 53, like in my case with blyx.com which is hosted at joker.com using their own name servers. I’ll use a subdomain called cloud.blyx.com for this example.
Long story short, the whole process is something like this:
- Add a hosted zone in Route 53
- Configure your DNS server to point the custom subdomain to Route 53
- Create the wildcard certificate
So let’s go ahead:
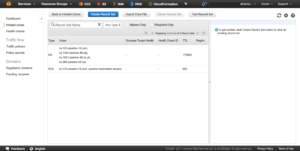
- Start creating a hosted zone in Route 53. This new hosted zone will be a subdomain of our main domain that we will be able to manage entirely in AWS for our wild card certificates and obviously for our load balancers and URLs domain names instead of using default amazonaws.com names, in my case, I create a hosted zone called “cloud.blyx.com”:
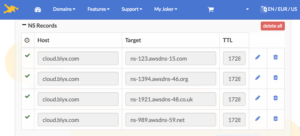
- Now we have to go to our DNS server and add all records that we got in the previous step, in my case I will do it using joker.com web panel, if you use Bind or other solution you have to create a NS zone called cloud.blyx.com (something like that, like a 3rd level domain) and then point the Name servers that we got from AWS Route 53 above. Here an example, easy:
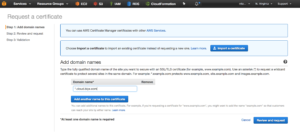
 3. Once we have all DNS steps done, let’s create our wild card certificate with AWS Certificate Manager for *.cloud.blyx.com. Remember that to validate the certificate creation you will get an email from AWS and you will have to approve the request by following the instructions on the email:
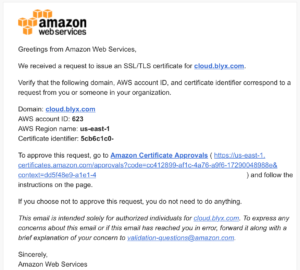
This is the email to approve the request:
Here is the approval page:
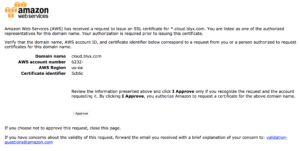
Once it is approved you will see it as “issued”. And you are ready to use it. Now, from CloudFormation we can call Route 53 and use your own certificate to make all communications through HTTPS when needed.
Hope you get this article helpful. The Trooper is coming!
One thought to “Getting started with AWS Certificate Manager (and Route53)”