Understanding Alfresco Content Deletion

As part of the work I’m doing for the upcoming Alfresco Summit, where I will be talking about my favorite topic: “Security and Alfresco”, I have written a few lines about Alfresco node deletion, how it works and why is important to take it into account in terms of security control.
I just wanted to clarify how Alfresco works when a content item is deleted and also how content deletion works in Records Management (RM). Basic content deletion is already very well explained in this Ixxus blog post but there are some differences in the database schema between Alfresco 4.1 and 4.2 worth noting, such as the alf_node table has a field named ‘node_deleted in versions 4.0 and earlier.
To develop a deep knowledge about Alfresco security and also how to configure Alfresco backup and disaster recovery, you should first need to understand how the Alfresco repository manages the lifecycle of a content item.
Node creation:
When a node is created,regardless how it is uploaded or created in Alfresco (via the API, web UI, FTP, CIFS, etc.)Alfresco will do the following:

  1. Metadata properties are stored into the Database in the logical store workspace://SpacesStore (alf_node, alf_content_url among others).
  2. The file itself is store and renamed as .bin under alf_data/contentstore/YYYY/MM/DD/hh/mm/url-id-of-the-file.bin
  3. Next, depending on your indexing you chose, its index entries are created within Lucene (alf_data/lucene-indexes/workspace/SpacesStore) or Solr (alf_data/solr/workspace/SpacesStore).
  4. Finally, in most cases, a content thumbnail is created as a child of the file created.

Node deletion:
There are two phases to node deletion:
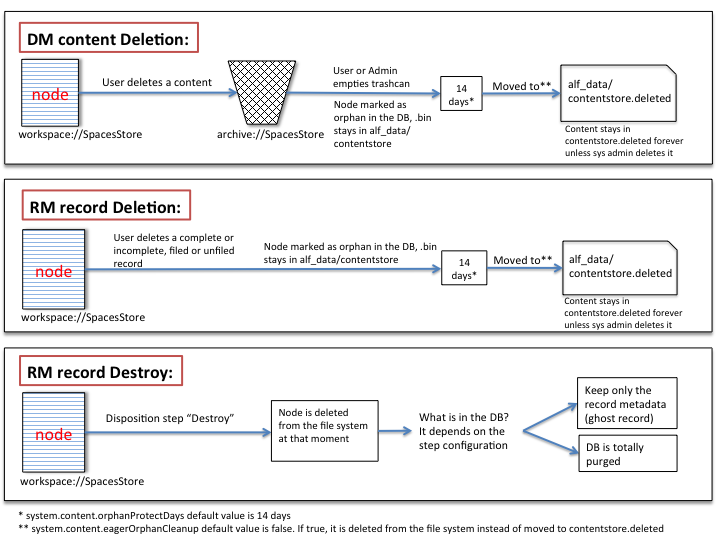
Phase 1- A user or admin deletes a content item (sending it to the trashcan):

  1. When someone deletes a content item, the content and its children (eg. thumbnails) are moved (archived) within  the DB from workspace://SpacesStore to archive://SpacesStore. Nothing else happens in the DB.
  2. The actual content “.bin” file remains in the same location inside the contentstore directory.
  3. Finally,the indexes are moved from the existing location to the corresponding archive alf_data/lucene-indexes/archive/SpacesStore) or Solr (alf_data/solr/archive/SpacesStore) depending on your index engine selection.

NOTE: A deleted node stays in the trashcan FOREVER, unless the user or admin either empties the trashcan or recovers the file. This default” behavior can be changed by using third party modules that empty the trashcan automatically on a custom schedule. See below for more information on these modules.
The trashcan may be found at these locations:
 Alfresco Share: User -> My Profile -> Trashcan (admin user will see all users deleted files, since 4.2 all users can also see and restore their own deleted files).
Alfresco Explorer: User Profile -> Manage Deleted Items (for all users).
Phase 2- Any user or admin (or trashcan cleaner) empties the trashcan:
That means the content is marked as an “orphan” and after a pre-determined amount of time elapses, the orphaned content item ris moved from the alf_data/contentstore directory to alf_data/contentstore.deleted directory.
Internally at DB level a timestamp (unix format) is added to alf_content_url.orphan_time field where an internal process called contentStoreCleanerJobDetail will check how many long the content has been orphaned.,f it is more than 14 days old, (system.content.orphanProtectDays option) .bin file is moved to contentstore.deleted. Finally, another process will purge all of its references in the database by running nodeServiceCleanupJobDetail and once the index knows the node has bean removed, the indexes will be purged as well.
NOTE: Alfresco will never delete content in alf_data/contentstore.deleted folder. It has to be deleted manually or by a scheduled job configured by the system administrator.
By default, the contentStoreCleanerJobDetail runs every day at 4AM by checking how the age of an orphan node and if it exceeds system.content.orphanProtectDays (14 days) it is moved to contentstore.deleted.
Additionally, the nodeServiceCleanupJobDetail runs every day at 9PM and purges information related to deleted nodes from the database.
Now, that we understand how Alfresco works by default, let’s learn how to modify Alfresco’s behavior in order to clean the trashcan automatically:
There are several third party modules to achieve this, but I recommend the Alfresco Trashcan Cleaner by Alfresco’s very own Rui Fernandes. Tt can be found at https://code.google.com/p/alfresco-trashcan-cleaner/.
Once the amp is installed, you can use this sample configuration  by copying it to alfresco-global.properties:

[bash]
trashcan.cron=0 30 * * * ?
trashcan.daysToKeep=7
trashcan.deleteBatchCount=1000

[/bash]

The options above configure the cleaner to run every hour at thethe half hour and it will remove content from the trashcan and mark them as orphan if a content has been in the trashcan for more than 7 days. It will do this in batches of 1000 deletions every time it runs. To delete from the trashcan without waiting any grace period set the trashcan.daysToKeep property value to -1.
Can I configure Alfresco to avoid using contentstore.deleted and ensure it really deletes a file after the trashcan is cleaned?
Yes, this is possible by setting system.content.eagerOrphanCleanup=true in alfresco-global.properties and once the trashcan is emptied, the file will not be moved to contentstore.deleted but it will be deleted from the file system (contentstore). After that, nodeServiceCleanupJobDetail will purge any related information from the database. Using sys:temporary aspect it also perform same behavior.
So, what is the recommended configuration for a production server?
This is something you have to figure out based on your backup and disaster recovery strategy. See my  Alfresco Summit presentation and white paper here: http://blyx.com/2013/12/04/my-talk-about-alfresco-backup-and-recovery-tool-in-the-alfresco-summit/.
If you have a proper l backup strategy, you can offer your users a grace period of 30 days to recover their own deleted documents from the trashcan and after the grace period delete them simultaneously from the trashcan and the filesystem. This can be achieved by installing the previously mentioned trashcan-cleaner and with this configuration in alfresco-global.properties:

[bash]
system.content.eagerOrphanCleanup=true
trashcan.cron=0 30 * * * ?
trashcan.daysToKeep=30
trashcan.deleteBatchCount=1000

[/bash]

And what about Alfresco Records Management, does it work in the same way? How a record destruction works?
In the Records Management world you don’t tend to delete documents as often it is done in Document Management. When a content item is deleted from the RM file plan, it is considered to be a regular delete operation. This is rarely used and only done by RM admins when there is some justifiable reason such as correcting  a mistake that requires a record to be removed.
The only difference is that the deleted record by-passes the archive store, hence it never goes to the trashcan, it is marked as orphan once it is deleted. Then it will be moved to contentstore.deleted after orphanProtectDays or it is truly deleted if eagerOrphanCleanup is set as true.
Destruction of a record works in the same way that a record is removed, this will by-pass the archive and immediately trigger the clean-up (eagerOrphanCleanup) process so the content does not stay in the file system contentstore or contentstore.deleted.
As far as the meta-data goes, there are two options; the first is that all the meta-data (and hence the node itself) are completely deleted, the alternative method cleans out all the content but the node remains with only the meta-data (called ghosting). In Alfresco RM versions before 2.2 this was a global configuration value (rm.ghosting.enabled=true), in 2.2 it can be defined on the destroy step of the disposition schedule: “Maintain record metadata after destroy”.

Alfresco content deletion graph
Alfresco content deletion

Some final words on content deletion:
As we have seen, Alfresco offers different ways to delete content. It is important to remember, even if Alfresco completely deletes content such as when using the destroy option in RM or by using eagerOrphanCleanup, Alfresco will not wipe the removed content from the physical storage, it therefore can be recovered by file system recovery tools. Wiping a deleted content item may vary depending on multiple factors, since filesystem type to hardware configuration, etc. If you want to guarranty a real physical wipe of a file in your file system, a third party software must be used to “zero out” the corresponding disk sectors. The specific tools depend on the operating system type, hardware, etc.
Thanks to my colleagues at Alfresco Kevin Dorr, Roy Wetherall for the Records Management section and Luis Sala for the document syntax review.

Alfresco Tip: How to enable SSL in Alfresco SharePoint Protocol

There are two ways to approach getting the Alfresco SharePoint Protocol to run over SSL and avoid having to modify the Windows registry for allow non-ssl connections from MS Office (in both Windows and Mac).

One way is to use the out of the box SSL certificate that Alfresco uses for communications between itself and Solr (this blog post is about this option). The other is to generate a new certificate and configure Alfresco to use it, which is the option if you want to use a custom certificate. Next steps tested on Alfresco 4.2, it should work in 4.2 as well for both Enterprise and Community. Please, let me know through a comment if you have an objection on this.

  • 1. Rename file tomcat/shared/classes/alfresco/extension/vti-custom-context.xml.ssl to tomcat/shared/classes/alfresco/extension/vti-custom-context.xml, if it does not exist just create it like below:

[xml]

<?xml version=’1.0′ encoding=’UTF-8′?>
<!DOCTYPE beans PUBLIC ‘-//SPRING//DTD BEAN//EN’ ‘http://www.springframework.org/dtd/spring-beans.dtd’>

<beans>
<!–
<bean id="vtiServerConnector" class="org.mortbay.jetty.bio.SocketConnector">
<property name="port">
<value>${vti.server.port}</value>
</property>
<property name="headerBufferSize">
<value>32768</value>
</property>
</bean>
–>

<!– Use this Connector instead for SSL communications –>
<!– You will need to set the location of the KeyStore holding your –>
<!– server certificate, along with the KeyStore password –>
<!– You should also update the vti.server.protocol property to https –>
<bean id="vtiServerConnector" class="org.mortbay.jetty.security.SslSocketConnector">
<property name="port">
<value>${vti.server.port}</value>
</property>
<property name="headerBufferSize">
<value>32768</value>
</property>
<property name="maxIdleTime">
<value>30000</value>
</property>
<property name="keystore">
<value>${vti.server.ssl.keystore}</value>
</property>
<property name="keyPassword">
<value>${vti.server.ssl.password}</value>
</property>
<property name="password">
<value>${vti.server.ssl.password}</value>
</property>
<property name="keystoreType">
<value>JCEKS</value>
</property>
</bean>
</beans>

[/xml]

  • 2. Now add the required attributes to alfresco-global.properties:

[bash]

vti.server.port=7070
vti.server.protocol=https
vti.server.ssl.keystore=/opt/alfresco/alf_data/keystore/ssl.keystore
vti.server.ssl.password=kT9X6oe68t
vti.server.url.path.prefix=/alfresco
vti.server.external.host=localhost
vti.server.external.port=7070
vti.server.external.protocol=https
vti.server.external.contextPath=/alfresco

[/bash]

Remember to change localhost to your server full name (i.e. your-server-name.domain.com).

  • 3. Restart the Alfresco application server and try the “Edit online” action on a MS Office document through Alfresco Share. A warning message will appear to accept the Alfresco self-signed certificate but is a common behavior.

Essential commands for Alfresco BART

Alfresco BART usage:

[bash]
./alfresco-bart.sh [set] [date dest]
[/bash]

But what really modes are? With modes I mean different ways to use Alfresco BART depending of what do you want to do, for instance:

  • backup: runs an incremental backup or a full if first time
  • restore: runs the restore, wizard if no arguments, see below more commands with arguments [set] [date] [dest], while [set] can also be “all” for all sets.
  • verify: verifies the backup, it compares what you have backed up and what you have in your live system.
  • collection: shows all the backup sets already in the backup archive that might be restored.
  • list: lists the files currently backed up in the archive. It shows files contained in the last backup.

Sets:

  • no value: use all backup sets
  • index: use index backup set (group) for selected mode.
  • db: use data base backup set (group) for selected mode.
  • cs: use content store backup set (group) for selected mode.
  • files: use rest of files backup set (group) for selected mode.

Now lets see how to use Alfresco BART.

To make a backup:

[bash]
./alfresco-bart.sh backup
[/bash]

NOTE1: if first time, it makes a full backup
NOTE2: you should add this command to your root crontab with something like “0 5 * * * /path/to/alfresco-bart.sh backup” (without quotes) if you want to run your backup daily at 5AM (after Alfresco’s nightly backups and maintenance jobs).
NOTE3: running command above with without any data sets (index, db, cs or files) it will perform a backup of all data sets configured in alfresco-bart.properties. You can run “./alfresco-bart.sh backup files” to only perform a backup of your configuration files, installation and customization files or “./alfresco-bart.sh backup cs” to create a backup (full if first time or incremental if not) of your contentstore and additional stores configured.

Commands and options to restore backup:

To restore an existing backup guided by the wizard:

[bash]
./alfresco-bart.sh restore

################## Welcome to Alfresco BART Recovery wizard ###################

This backup and recovery tool does not overrides nor modify your existing
data, then you must have a destination folder ready to do the entire
or partial restore process.

##############################################################################

Choose a restore option:
1) Full restore
2) Set restore
3) Restore a single file of your Alfresco repository
4) Restore alfresco-global.properties from a given date
5) Restore other configuration file or directory

Enter an option [1|2|3|4|5] or CTRL+c to exit:
[/bash]

To restore the last (now) existing backup of all sets (all) and leave it in /tmp:

[bash]
./alfresco-bart.sh restore all now /tmp
[/bash]

To restore a DB backup from 14 days ago to /tmp:

[bash]
./alfresco-bart.sh restore db 14D /tmp
[/bash]

To restore the indexes backup from december 2nd 2013:

[bash]
./alfresco-bart.sh restore index 12-02-2013 /tmp
[/bash]

Valid date format is: now: for last backup, s: for second, m: minutes, h: hours, D: days, W: weeks, M: months or Y: years, all date values must be specified without spaces, i.e: 4D, 2W, 1Y, 33m. Dates may also be like: YYYY/MM/DD, YYYY-MM-DD, MM/DD/YYYY or MM-DD-YYYY.

To restore a single file deleted on the repository but existing in previous backup please use the backup wizard by typing: “./alfresco-bart.sh restore” and then follow instructions in the menu option “3”.

To restore the alfresco-global.properties configuration file from a given date please use the backup wizard by typing: “./alfresco-bart.sh restore” and then follow instructions in the menu option “4”.

Finally if you want to restore any other configuration, installation or custom file from your existing backup on a given date follow instructions by choosing option 5 in the recovery wizard.

NOTE4: Alfresco BART restore options or recovery wizard never will overrides your existing Alfresco files, you should specify a temporary recovery folder with enough space, then you have to move that content manually or following the instructions on the screen.

In case of source mismatch error with Duplicity try running this command:

[bash]
./alfresco-bart.sh backup all force
[/bash]

My talk about “Alfresco Backup and Recovery Tool” in the Alfresco Summit

All recorded videos has been published recently in the Alfresco Summit portal and here you go my talk “Alfresco Backup and Recovery Tool: A Real World Backup Solution” I gave in both Boston and Barcelona. I was the first public presentation about Alfresco BART.

Thanks to all who attended this session and made it one of the most-well attended and highest-rated in both cities. I’m looking forward to keep talking covering security topics as usual (I already have some “hack-ideas”…).

If you only want to see the demo, it starts at minute 33:

The presentation is published in Slideshare as well:

Remember you can download here the White Paper I mention during the talk.

If you only want to see the practical demo (best resolution in the talk video above), you can enjoy it here:

Any questions and comments are always welcome!

Running the Alfresco Solr backup from the command line

SOLR can be backed up by different ways. It uses a scheduled job by default but also can be triggered by the JMX interface in Alfresco Enterprise. Additionally can be done by direct using next URLs. Example for doing a backup of the alfresco solr core and only keep 1 backup:

https://localhost:8443/solr/alfresco/replication?command=backup&location=/opt/alfresco/alf_data/solrBackup/alfresco&numberToKeep=1

For the archive core and only keep 1 backup:

https://localhost:8443/solr/archive/replication?command=backup&location=/opt/alfresco/alf_data/solrBackup/archive&numberToKeep=1

In order to do the backup from the command line, you may use the “curl” command and run it like this (see comment about pem certificate below):

[bash]curl -k –cert /opt/alfresco/alf_data/keystore/browser.pem:alfresco "https://localhost:8443/solr/alfresco/replication?command=backup&location=/opt/alfresco/alf_data/solrBackup/alfresco&numberToKeep=1"
[/bash]


[bash]curl -k –cert /opt/alfresco/alf_data/keystore/browser.pem:alfresco "https://localhost:8443/solr/archive/replication?command=backup&location=/opt/alfresco/alf_data/solrBackup/archive&numberToKeep=1"
[/bash]

Please, note that “curl” does not support p12 certificates therefore you need to convert the default browser.p12 to browser.pem by running (password is alfresco):

[bash]
openssl pkcs12 -in /opt/alfresco/alf_data/keystore/browser.p12 -out /opt/alfresco/alf_data/keystore/browser.pem –nodes
[/bash]

This option will be included in next version (0.3) of the Alfresco BART (Backup and Recovery Tool).

Alfresco Backup and Recovery Tool, release v0.1

Project was moved to Github!

Please go to https://github.com/toniblyx/alfresco-backup-and-recovery-tool for downloads, questions, issues, suggestions or feedback. Thanks!

Here you go, first release of the Alfresco Backup and Recovery Tool (Alfresco BART). An Apache 2.0 licensed tool for backup and restore of Alfresco ECM.

DESCRIPTION
Alfresco BART is a tool written in shell script on top of Duplicity for Alfresco backups and restore from a local file system, FTP, SCP or Amazon S3 of all its components: indexes, data base, content store and all deployment and configuration files. It should runs in most Linux distributions, for Windows you may use Cygwin (non tested yet).

Brief description of its features: full and incremental backups, backup policies, backup volume control, encryption with GPG, compression. Also it has a restore wizard with shortcuts for quick restore of some key components (alfresco-global.properties and more).

DISCLAIMER
This is an initial version, it has bugs and needs many improvements, please take care 🙂

FEATURES
Features in this version (v0.1):

  • 5 different modes of work: backup, restore, verify, collection and list
    • backup: runs an incremental backup or a full if first time or configured
    • restore: runs the restore wizard
    • verify: verifies the backup
    • collection: shows all the backup sets in the archive
    • list: lists the files currently backed up in the archive
  • Full and incremental backups.
  • Backup policies:
    • Periodicity: number of days of every full backup, if not backup found it does a full
    • Retention: keep full or incremental copies, clean old backups.
    • Control of number of moths to remove all backups older than or backup retention period.
  • Separated components (backup sets or groups), ability to enable or disable any set (cluster and dedicated search server aware), all backup sets supported are:
    • Indexes (SOLR or Lucene)
    • Data base (MySQL, PostgreSQL and Oracle)
    • Content Store plus deleted, cached and content store selector (optional).
    • Files: all configuration files, deployments, installation files, etc.
  • Restore wizard with support to:
    • restore a full backup (all sets)
    • given backup set
    • restore from a given date or days, month, year ago
    • restore alfresco-global.properties from a point in time
  • Backup volume control:
    • All backups collections are split in a volume size 25MB by default, this can help to store your backup in tapes or in order to upload to a FTP, SCP or S3 server.
  • Backup to different destinations:
    • Local filesystem
    • Remote FTP or FTPS server
    • SCP server (should have shared keys already configured, no authentication with user and password supported)
    • Amazon S3
  • Encryption with GnuPG, all backup volumes are encrypted, this feature is configurable (enable or disable).
  • Compression, all backup volumes are compressed by default
  • Log reporting, Alfresco BART creates a log file each day of operation with in a report of any activity.

DEPENDENCES

  • Duplicity 0.6 (with boto and fabric)
  • Python 
  • GnuPG
  • NcFTP
  • librsync
  • mysqldump for MySQL backup
  • pg_dump for PostgreSQL backup
  • exp for Oracle backup

TODO

  • TEST, TEST and TEST with JBOSS, MySQL, Oracle, S3, FTPs, SCP, etc.
  • Add more input and task controllers (and configuration, first run).
  • Restore single repository file.
  • Snapshots (LVM if exist, AWS if exist).
  • Support for MS SQL Server.
  • Configuration wizard (shell).
  • Share admin panel configuration page as main point to configure more options related to backup (eager, cleaner, index backup, trascan cleaner, etc.).
  • Custom logging control and reporting improvement.

DOWNLOADS and INSTALLATION 

Most recent information about tool and latest code is available in:
http://blyx.com/alfresco-bart

Please report bugs and improvements to: reverse moc.xylb@inot

Playing with Duplicity backup and restore tool and Amazon S3

Duplicity is a python command line tool for encrypted bandwidth-efficient backup.

In their creator words: “Duplicity  incrementally  backs  up  files  and directory by encrypting tar-format volumes with GnuPG and uploading them to a remote (or local) file server.  Currently local, ftp, sftp/scp, rsync, WebDAV, WebDAVs, Google Docs, HSi and Amazon S3 backends  are  available.   Because  duplicity  uses librsync,  the  incremental  archives  are  space  efficient  and only record the parts of files that have changed since the last backup.  Currently duplicity supports deleted files, full Unix permissions, directories, symbolic links, fifos, etc., but not hard links.

My brief description: a free and open source tool for doing full and incremental backup and restore from linux to local or almost any remote target, compressed and encrypted. A charm for any sys admin.

In order to explain how Duplicity works for backup and restore. I’m going to show how to do a backup of a folder called “sample_data” to an Amazon S3 bucket called “alfresco-backup” and a folder called “test” inside my bucket (use your own bucket name) the bucket and folder has been created by me before running any command but could be created by duplicity first time we run the command. If you want to let Duplicity create your own Amazon S3 bucket and you are located in Europe, please read the Duplicity man page.

Note: please not get confused with my bucket name “alfresco-backup”, use your own bucket name. I will use this bucket name also in future articles 😉

How to install Duplicity in Ubuntu:

[bash]
# sudo apt-get install duplicity
[/bash]

Create a gpg key and remember the passphrase because will be required by Duplicity, defaults values works good. Your backup will be encrypted with the passphrase, all files created by command below will be on your Linux home/.gnupg but you won’t need that at all:

[bash]
# gpg –gen-key
[/bash]

Create required system variables (you can also use them with an script):

[bash]
# export PASSPHRASE=yoursupersecretpassphrase
# export AWS_ACCESS_KEY_ID=XXXXXXXXXXX
# export AWS_SECRET_ACCESS_KEY=XXXXXXXXXX
[/bash]

Backup:

To perform a backup with the Duplicity command (the easy and simple command):

[bash]
# duplicity sample-data/ s3+http://alfresco-backup/test
[/bash]

If you get errors, some dependencies for Python and S3 support are required, try installing librsync1 and next python libraries python-gobject-2, boto and dbus.

The command output should be something like this:

[bash]
Local and Remote metadata are synchronized, no sync needed.
Last full backup date: none
No signatures found, switching to full backup.
————–[ Backup Statistics ]————–
StartTime 1368207483.83 (Fri May 10 19:38:03 2013)
EndTime 1368207483.86 (Fri May 10 19:38:03 2013)
ElapsedTime 0.02 (0.02 seconds)
SourceFiles 5
SourceFileSize 1915485 (1.83 MB)
NewFiles 5
NewFileSize 1915485 (1.83 MB)
DeletedFiles 0
ChangedFiles 0
ChangedFileSize 0 (0 bytes)
ChangedDeltaSize 0 (0 bytes)
DeltaEntries 5
RawDeltaSize 1907293 (1.82 MB)
TotalDestinationSizeChange 5543 (5.41 KB)
Errors 0
————————————————-
[/bash]

This will create 3 files in your S3 bucket:

  • duplicity-full-signatures.20130510T160711Z.sigtar.gpg
  • duplicity-full.20130510T160711Z.manifest.gpg
  • duplicity-full.20130510T160711Z.vol1.difftar.gpg

All files are stored with the GNU tar format and encrypted, “duplicity-full” means that was first backup, in next backups you will see “duplicity-inc” in different volumes.

  • sigtar.gpg file contains files signatures then Duplicity will know what file has changed and do the incremental backup
  • manifest.gpg contains all files backed up and a SHA1 hash of each one
  • volume files (vol1 to volN depending of your backup size) will contains data files, a volume file use to be up to 25MB each one, this is for improve performance doing backup and restoration.

For more information about file format look at here: http://duplicity.nongnu.org/duplicity.1.html#sect19

[bash]
# duplicity –full-if-older-than 30D sample-data s3+http://alfresco-backup/test
[/bash]

Verify if there are changes between last backup and your local files:

[bash]
# duplicity verify s3+http://alfresco-backup/test sample-data
Local and Remote metadata are synchronized, no sync needed.
Last full backup date: Fri May 10 19:38:03 2013
Difference found: File . has mtime Fri May 10 19:39:05 2013, expected Fri May 10 19:34:53 2013
Difference found: File file1.txt has mtime Fri May 10 19:39:05 2013, expected Fri May 10 18:25:36 2013
Verify complete: 5 files compared, 2 differences found.
[/bash]

In last example we can see that a fine called file1.txt has changed and also the root directory “.” date,

List files backed up in S3:

[bash]
# duplicity list-current-files s3+http://alfresco-backup/test
Local and Remote metadata are synchronized, no sync needed.
Last full backup date: Fri May 10 18:32:59 2013
Fri May 10 19:34:53 2013 .
Fri May 10 18:25:36 2013 file1.txt
Fri May 10 18:54:31 2013 file2.txt
Fri May 10 19:35:03 2013 mydir
Fri May 10 19:35:03 2013 mydir/file3.txt
[/bash]

You can see 3 files and 2 directories, in the statistics report duplicity counts any directory as file.

Restore:

Duplicity can also manage the restore process but it will never override any existing file, the you can restore to a different location or remove your corrupted or old data if you want to restore in the original place. If duplicity successfully completes the restore it is not going to show any output.

How to restore last full backup:

[bash]
# duplicity s3+http://alfresco-backup/test restore-dir/
[/bash]

How to restore a single file:

[bash]
# duplicity –file-to-restore mydir/file3.txt s3+http://alfresco-backup/test restore-dir/file3.txt
[/bash]

How to restore entire backup in a given date:

[bash]
# duplicity -t 2D s3+http://alfresco-backup/test restore-dir/
[/bash]

this will restore full backup of  2 days ago (see -t options, seconds, minutes, hours, months, etc may be used)

How to restore a single file in a given date:

If you are looking for a file with a content but you don’t know what version of the file you have to recover, you can try restoring different file versions in the backup:

[bash]
# duplicity -t 2D –file-to-restore file1.txt s3+http://alfresco-backup/test file1.txt.2D
# duplicity -t 30D –file-to-restore file1.txt s3+http://alfresco-backup/test file1.txt.30D
[/bash]

Note, you have to specify a different file name for local restoration, remember that duplicity never overrides existing content.

Delete older backups:

[bash]
# duplicity remove-older-than 1Y s3+http://alfresco-backup/test –force
[/bash]

also you can use for example 6M (six months), 30D (30 days) or 60m (60 minutes).

To see more information when you are running a duplicity command can use the vervosity flag -v [1-9] but also can see all logs here /root/.cache/duplicity/[directory with unique ID]/duplicity-full.YYYMMDDT182930Z.manifest.part

When you are finished playing with Duplicity and Amazon S3 remember to clean your passphrase and Amazon keys from the variables:

[bash]
# unset PASSPHRASE
# unset AWS_ACCESS_KEY_ID
# unset AWS_SECRET_ACCESS_KEY
[/bash]

In next posts I will show  how to use Duplicity to have a perfect backup and restore policy of Alfresco.

OpenDJ (LDAP Server) and how to configure with Alfresco for your best demos

OpenDJ is a fork of the former Sun OpenDS. Is a free and Open Source LDAPv3 server. It is not under our Alfresco Supported Platforms umbrella but it works fine for demo porpuses and is very easy to install, configure and maintain. Since OpenDJ is a Java application you can run it in Linux, Mac or “even” Windows 😉

Lets see how how to start with OpenDJ from scratch.

  • Installation and configuration of OpenDJ:

Download the application downloader and launcher here: http://download.forgerock.org/downloads/opendj/20130305020001/install/QuickSetup.jnlp (you may also download the entire package from here http://www.forgerock.org/opendj.html  but I think with QuickSetup is the easier way)

Download this initial LDIF file with demo users and groups for the first population of our new brand LDAP server.

You must have installed Java in your system in order to execute file QuickSetup.jnlp. Then double click to open it. And follow as in the video:

Now lets configure our Alfresco Server (I did all this steps with Alfresco Enterprise 4.1.3 but should be valid for any 4.X version).

  •  Alfresco configuration:

[bash]
# vi tomcat/shared/classes/alfresco-global.properties
[/bash]

Add next line with our new authentication system before the default chain.

[bash]
authentication.chain=ldap1:ldap,alfrescoNtlm1:alfrescoNtlm
[/bash]

Create the needed directory for our new settings:

[bash]
# mkdir -p tomcat/shared/classes/alfresco/extension/subsystems/Authentication/ldap/ldap1
[/bash]

Create your own config file, set as your needs:

[bash]
vi tomcat/shared/classes/alfresco/extension/subsystems/Authentication/ldap/ldap1/ldap-authentication.properties
[/bash]

File:

[bash]
ldap.authentication.active=true
ldap.authentication.allowGuestLogin=false
ldap.authentication.userNameFormat=uid=%s,ou=people,dc=alfresco,dc=com
ldap.authentication.java.naming.factory.initial=com.sun.jndi.ldap.LdapCtxFactory
ldap.authentication.java.naming.provider.url=ldap://localhost:1389
ldap.authentication.java.naming.security.authentication=simple
ldap.authentication.escapeCommasInBind=false
ldap.authentication.escapeCommasInUid=false
ldap.authentication.defaultAdministratorUserNames=
ldap.synchronization.active=false
ldap.synchronization.java.naming.security.authentication=simple
ldap.synchronization.java.naming.security.principal=cn\=Directory Manager
ldap.synchronization.java.naming.security.credentials=secret
ldap.synchronization.queryBatchSize=0
ldap.synchronization.attributeBatchSize=0
ldap.synchronization.groupQuery=(objectclass\=groupOfNames)
ldap.synchronization.groupDifferentialQuery=(&(objectclass\=groupOfNames)(!(modifyTimestamp<\={0})))
ldap.synchronization.personQuery=(objectclass\=inetOrgPerson)
ldap.synchronization.personDifferentialQuery=(&(objectclass\=inetOrgPerson)(!(modifyTimestamp<\={0})))
ldap.synchronization.groupSearchBase=ou\=groups,dc\=alfresco,dc\=com
ldap.synchronization.userSearchBase=ou\=people,dc\=alfresco,dc\=com
ldap.synchronization.modifyTimestampAttributeName=modifyTimestamp
ldap.synchronization.timestampFormat=yyyyMMddHHmmss’Z’
ldap.synchronization.userIdAttributeName=uid
ldap.synchronization.userFirstNameAttributeName=givenName
ldap.synchronization.userLastNameAttributeName=sn
ldap.synchronization.userEmailAttributeName=mail
ldap.synchronization.userOrganizationalIdAttributeName=o
ldap.synchronization.defaultHomeFolderProvider=largeHomeFolderProvider
ldap.synchronization.groupIdAttributeName=cn
ldap.synchronization.groupDisplayNameAttributeName=description
ldap.synchronization.groupType=groupOfNames
ldap.synchronization.personType=inetOrgPerson
ldap.synchronization.groupMemberAttributeName=member
ldap.synchronization.enableProgressEstimation=true
ldap.authentication.java.naming.read.timeout=0
[/bash]

To have a full control about what is happening during the LDAP authentication add next lines to your custome log configuration file like next one. If you don’t have a custom log file already you can create it:

[bash]
cp tomcat/webapps/alfresco/WEB-INF/classes/log4j.properties tomcat/shared/classes/alfresco/extension/custom-log4j.properties
[/bash]

Add next options to the file:

[bash]
vi tomcat/shared/classes/alfresco/extension/custom-log4j.properties
[/bash]

Content:

[bash]
# LDAP
log4j.logger.org.alfresco.repo.importer.ImporterJob=debug
log4j.logger.org.alfresco.repo.importer.ExportSourceImporter=debug
log4j.logger.org.alfresco.repo.security.authentication.ldap=debug
[/bash]

Now reboot and try. Also you can do that easily and without reboot using JMX with console

Remember to keep watching your logs:

[bash]
tail -f tomcat/logs/catalina.out
[/bash]

When Alfresco is starting after our changes, you must see something like this:

[bash]
2013-03-07 09:46:26,175  INFO  [management.subsystems.ChildApplicationContextFactory] [main] Starting ‘Authentication’ subsystem, ID: [Authentication, managed, ldap1]
2013-03-07 09:46:26,212  WARN  [authentication.ldap.LDAPInitialDirContextFactoryImpl] [main] LDAP server supports anonymous bind ldap://localhost:1389
2013-03-07 09:46:26,234  INFO  [authentication.ldap.LDAPInitialDirContextFactoryImpl] [main] LDAP server does not support simple string user ids and invalid credentials at ldap://localhost:1389
2013-03-07 09:46:26,235  INFO  [authentication.ldap.LDAPInitialDirContextFactoryImpl] [main] LDAP server does not fall back to anonymous bind for a simple dn and password at ldap://localhost:1389
2013-03-07 09:46:26,237  INFO  [authentication.ldap.LDAPInitialDirContextFactoryImpl] [main] LDAP server does not fall back to anonymous bind for known principal and invalid credentials at ldap://localhost:1389
2013-03-07 09:46:26,247  INFO  [management.subsystems.ChildApplicationContextFactory] [main] Startup of ‘Authentication’ subsystem, ID: [Authentication, managed, ldap1] complete
[/bash]

And after your first login:

[bash]
2013-03-07 09:47:34,404  DEBUG [authentication.ldap.LDAPAuthenticationComponentImpl] [http-8080-5] Authenticating user "toni"
2013-03-07 09:47:34,421  DEBUG [authentication.ldap.LDAPAuthenticationComponentImpl] [http-8080-5] Setting the current user to "toni"
2013-03-07 09:47:34,422  DEBUG [authentication.ldap.LDAPAuthenticationComponentImpl] [http-8080-5] User "toni" authenticated successfully
[/bash]

Remember to change your LDAP log debug level before going live, something like INFO could be enough.

Revisión del libro “Hacker Épico” de Informática64

Hacker ÉpicoHoy quiero comentar este libro, Hacker Épico. Magistralmente escrito por Alejandro Ramos (Dab) y Rodrigo Yepes, publicado y editado por Informatica64. Si empiezas no puedes dejarlo hasta que no lees la última página, te mantiene enganchado, en tensión, disfrutándolo y aprendiendo con cada una de sus poco más de 250 páginas.

Contada en primera persona por Ángel Ríos, el hacker protagonista, esta novela trata sobre la aventura en la que se ve envuelto este informático que trabaja para una prometedora consultora de seguridad como auditor y junto a la ayuda de su amigo Marcos, se enfrenta a un sin fin de retos que pondrán a prueba sus habilidades de hacking y análisis forense a lo largo de toda la trama. Ambientada en la Madrid actual, este thriller hacker se basa en hechos que lamentablemente leemos con demasiada asiduidad en prensa.

Como sabéis los que seguís el blog, comento muchos libros técnicos en blyx.com, generalmente relacionados de alguna forma con Alfresco. A diferencia de esos otros libros que he comentado, en esta ocasión no voy a hacer un repaso de cada capítulo ya que no quiero dar ninguna pista sobre lo que acontece en la historia, solo quiero limitarme publicar mi opinión y notas que he ido tomando mientras lo leía.

Hacker Épico no es una novela al uso, va mucho más allá, es un completo y actualizado manual de referencia, herramientas, casos de uso prácticos y totalmente actuales en los que, si estáis involucrados de alguna forma en el mundo de la seguridad informática, os sentiréis muy identificados y también, como ha sido mi caso, aprenderéis muchísimo mientras devoráis, sin necesidad de marca-páginas, esta maravilla.

Es un libro que no solo se lee una vez, puede ser perfectamente un libro de cabecera al que recurrir más de una vez. Como decía antes, prepárate una libreta (o Evernote en mi caso) mientras lo estés leyendo, podrás tomar jugosas notas, ver como se descubren vulnerabilidades 0day, saltar la seguridad de cámaras, puertas traseras, dominios, Windows, Linux, PDFs, redes WiFi y mucho más.

Por supuesto, también tiene su punto friki, como no podía ser de otra forma, no hay capítulo en el que no se hagan guiños al cine de superhéroes, series de culto y a otras novelas, e incluso a otros personajes de la escena hacker española. También se encuentran detalles y chascarrillos para gamers. Incluso, si conoces Madrid, te puedes ir imaginando algunas escenas descritas.

Fuga de datos, aplicaciones como Whatsapp, recursos web y redes sociales reales, iPhones, iPads… Conceptos, argumentos y soluciones bien documentados y totalmente cercanos al mundo real. Podrás ver como se hacen análisis forenses e incluso algunas partes de la trama y comentarios suenan muy familiares.

Un recorrido através de un sin fin de herramientas explicando cada uno de los flags utilizados.

¿Estamos ante el principio de una saga? ¿Son Alejandro y Rodrigo los Neal Stephenson y Clifford Stoll españoles? No lo sé, pero desde luego que no tienen nada que envidiarles, por lo menos por las sensaciones que provocan en el lector, igual que otras novelas del estilo como Criptonomicon o El Huevo del Cuco.

Aunque los autores se preocupan por explicar de la forma más sencilla posible algunas de las peripecias puramente técnicas del protagonista, si no estas familiarizado con algunos conceptos informáticos en algunas ocasiones puede resultar un poco difícil seguir la trama al 100%, de cualquier forma, si no eres informático o si lo eres y no entiendes algo siempre puedes buscar en internet lo que no entiendas. Así que, además de disfrutar, aprenderás más de lo que imaginas.

Hace unos años tuve el privilegio de trabajar durante unos días en el mismo departamento que Alejandro Ramos y compartir amigos comunes. Así que estoy doblemente orgulloso de que en nuestro país se escriban estas obras de arte y encima sea gente que se ha ganado lo que tiene a base de esfuerzo y pasión por esta locura infinita que es la seguridad informática. Gracias.

Seguro que no va a ser el único que diga que quiere más. ¡Quiero más aventuras de Ángel y Marcos!

Puedes comprarlo por 20€ en la web de Informática64, no te vas a arrepentir, te lo prometo.

¿Para cuándo la película?