SOLR can be backed up by different ways. It uses a scheduled job by default but also can be triggered by the JMX interface in Alfresco Enterprise. Additionally can be done by direct using next URLs. Example for doing a backup of the alfresco solr core and only keep 1 backup:
Please, note that “curl” does not support p12 certificates therefore you need to convert the default browser.p12 to browser.pem by running (password is alfresco):
I have been playing with Amazon Web Services since few months ago. AWS is for a SysAdmin like Disneyland is for a 8 years old child, I enjoy so much doing this kind of stuff.
If you are not familiar with AWS products/services, let me describe with Amazon words and in my own words what are the most important services and concepts we have been using for deploying an Alfresco on-premise installation in AWS:
EC2: virtual servers in the cloud.
VPC: isolated cloud resources. Yes, a real isolated cloud architecture and resources.
S3: Scalable storage, like a CAS (Content Addressable Storage) for your local or cloud servers.
RDS: Managed Relational Database Service (MySQL, Oracle or MS SQL Server).
ELB: Elastic Load Balancer, as part of EC2 allows you to create load balancers easily.
CloudFormation: Templated AWS resource creation. *This is why I’m writing this article. A CloudFormation template is a json file which creates a wizard and options based in our needs.
AZ: Availability Zone (data centers connected through low-latency links in the same region).
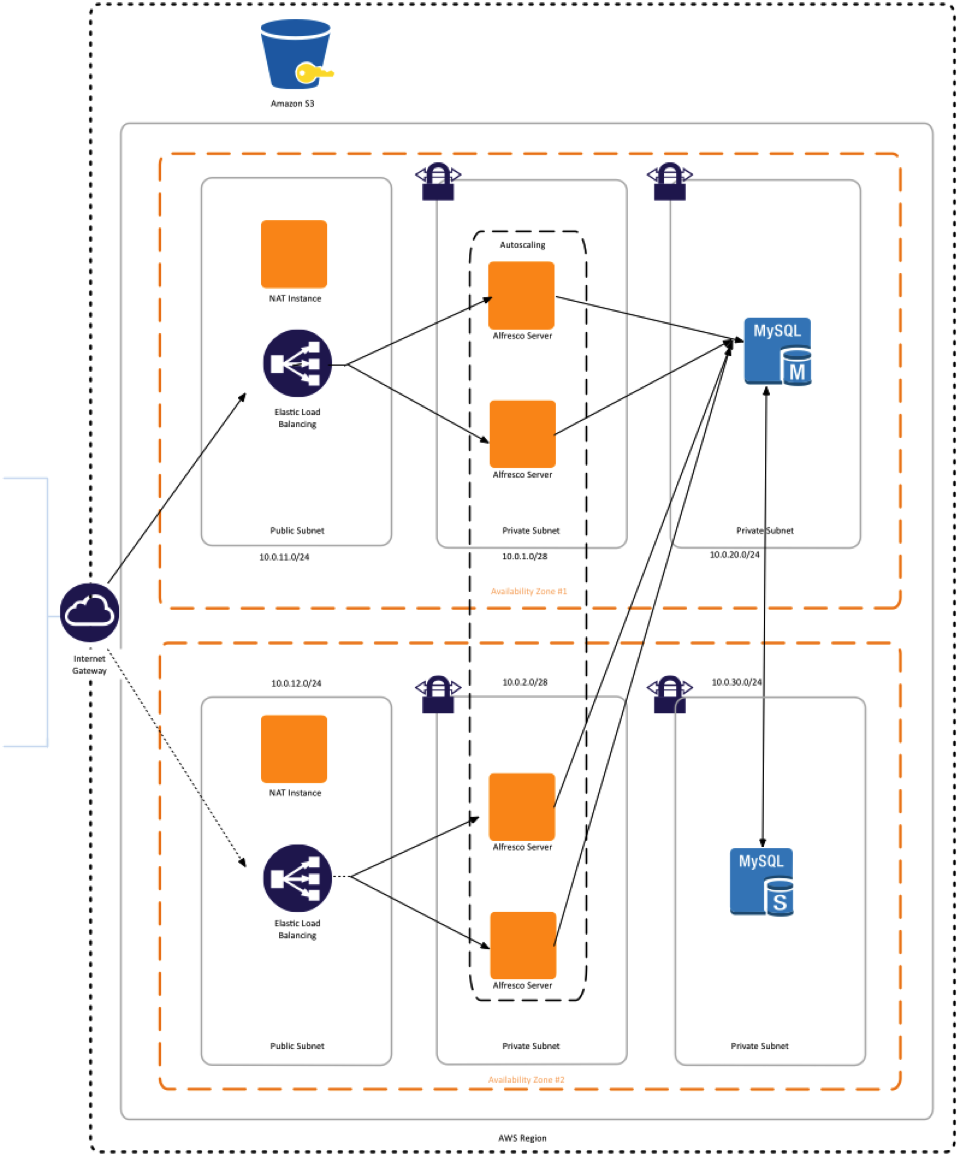
Once said so, my colleague Luis Sala has been working together with the Amazon AWS crew and they have made a CloudFormation template to deploy an Alfresco cluster in just minutes. This template is available here: https://github.com/AlfrescoLabs/alfresco-cloudformation.
This CloudFormation template will create a 2 nodes Alfresco cluster inside a virtual private cloud (VPC), a Load Balancer (ELB) with sticky sessions bases on the Tomcat JSESSIONID, a shared ContentStore based on S3, a shared MySQL DB based on a RDS instance. Each Alfresco node will be in a separate Availability Zone and finally the template includes auto-scaling roles for add extra Alfresco nodes when some thresholds are reached.
We will have something like the diagram below, I say “like this” because we will have only 2 Alfresco nodes in the cluster and the auto-scaling will add more nodes in case of thresholds are reached (clic to see it bigger).
Finally in the video below you can see step by step a real CloudFormation deployment, I think the video screencast is self-explanatory, it does not have audio. As you can see, the video is 6 minutes length after cropping some dead times but it was around 15 minutes total.
I thought it is a very interesting approach about Alfresco clustering and it worth it to share with you all. Any question or feedback is welcome, even in spanish or english 😉
I use to be asked about the ability of Alfresco to compare documents or versions of a document. I used to say “not by default” but, this is not totally true, the right answer is “it depends”. In Alfresco, thanks “Edit Online” option and to the Share Point Protocol implementation in the server and with MS Office 2010 (or any other version with SPP support), you can compare versions of MS Office documents stored in Alfresco. Here you can see what I’m saying:
Apart from this solution, that is very straightforward but also very Windoze based solution, you can try to implement some of these other options (I haven’t tried them, by the way):
DESCRIPTION Alfresco BART is a tool written in shell script on top of Duplicity for Alfresco backups and restore from a local file system, FTP, SCP or Amazon S3 of all its components: indexes, data base, content store and all deployment and configuration files. It should runs in most Linux distributions, for Windows you may use Cygwin (non tested yet).
Brief description of its features: full and incremental backups, backup policies, backup volume control, encryption with GPG, compression. Also it has a restore wizard with shortcuts for quick restore of some key components (alfresco-global.properties and more).
DISCLAIMER
This is an initial version, it has bugs and needs many improvements, please take care 🙂
FEATURES
Features in this version (v0.1):
5 different modes of work: backup, restore, verify, collection and list
backup: runs an incremental backup or a full if first time or configured
restore: runs the restore wizard
verify: verifies the backup
collection: shows all the backup sets in the archive
list: lists the files currently backed up in the archive
Full and incremental backups.
Backup policies:
Periodicity: number of days of every full backup, if not backup found it does a full
Retention: keep full or incremental copies, clean old backups.
Control of number of moths to remove all backups older than or backup retention period.
Separated components (backup sets or groups), ability to enable or disable any set (cluster and dedicated search server aware), all backup sets supported are:
Indexes (SOLR or Lucene)
Data base (MySQL, PostgreSQL and Oracle)
Content Store plus deleted, cached and content store selector (optional).
Files: all configuration files, deployments, installation files, etc.
Restore wizard with support to:
restore a full backup (all sets)
given backup set
restore from a given date or days, month, year ago
restore alfresco-global.properties from a point in time
Backup volume control:
All backups collections are split in a volume size 25MB by default, this can help to store your backup in tapes or in order to upload to a FTP, SCP or S3 server.
Backup to different destinations:
Local filesystem
Remote FTP or FTPS server
SCP server (should have shared keys already configured, no authentication with user and password supported)
Amazon S3
Encryption with GnuPG, all backup volumes are encrypted, this feature is configurable (enable or disable).
Compression, all backup volumes are compressed by default
Log reporting, Alfresco BART creates a log file each day of operation with in a report of any activity.
DEPENDENCES
Duplicity 0.6 (with boto and fabric)
Python
GnuPG
NcFTP
librsync
mysqldump for MySQL backup
pg_dump for PostgreSQL backup
exp for Oracle backup
TODO
TEST, TEST and TEST with JBOSS, MySQL, Oracle, S3, FTPs, SCP, etc.
Add more input and task controllers (and configuration, first run).
Restore single repository file.
Snapshots (LVM if exist, AWS if exist).
Support for MS SQL Server.
Configuration wizard (shell).
Share admin panel configuration page as main point to configure more options related to backup (eager, cleaner, index backup, trascan cleaner, etc.).
For a personal project I was wondering if I can invite a group of friends to a site without having to get them access to my Alfresco, just wanted to give them access to certain site as consumers.
Here is how I did that, once I generate a list of friends like below (file solo-mails.txt):
I run next curl command in JSON format. Remember that $i is the mail address of any friend, use your own admin credentials as user:password, you should change ‘surname’, localhost, and site name ‘mysite’ in the URL. The option -H “Accept-Language: en,en;q=0.8” will send the invitation in english, if you want to sent it in spanish use Accept-Language: es,en;q=0.8.
for i in `cat solo-mails.txt`; do curl -i -u user:password -H “Content-Type: application/json” -H “Accept-Language: en,en;q=0.8” -d “{‘invitationType’:’NOMINATED’,’inviteeUserName’:”,’inviteeRoleName’:’SiteConsumer‘,’inviteeFirstName’:’$i‘,’inviteeLastName’:’surname‘,’inviteeEmail’:’$i‘,’serverPath’:’http://localhost:8080/share/’,’acceptURL’:’page/accept-invite’,’rejectURL’:’page/reject-invite’}” “http://localhost:8080/alfresco/s/api/sites/mysite/invitations“; done
This command will send an invitation with an autogenerated username and a password.
As I mentioned, command above is for external users, but if you want to do same thing for internals use same command but the value ‘inviteeUserName’ has to have the username you want to invite, for example ‘inviteeUserName’:’toni’. Obviously I run this command from my Mac also valid from a Linux with curl.
Thanks to my colleague at Alfresco Rui Fernandes, he pointed me out about where to start.
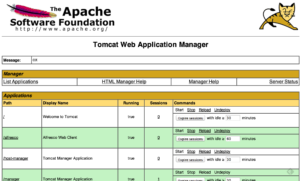
In order to address some maintenance tasks in Tomcat, may be useful to get access to the Tomcat Manager (http) interface, things like stop or start an application if you are doing some changes in Alfresco or Share, even a different way to access to its JMX interface using jmxproxy if you are working remotely.
This is a easy step by step guide about how you can enable the Tomcat Manager that comes with an Alfresco default (bundle) installation. Tested with Alfresco Enterprise 4.1.4, but should work with any other Alfresco 4 version.
Edit tomcat/conf/tomcat-users.xml and adapt it like below:
Once Alfresco is up agan, lets try to access to the manager with user “manager” and password “manager”, please avoid using this credentials in production environments.
OpenDJ is a fork of the former Sun OpenDS. Is a free and Open Source LDAPv3 server. It is not under our Alfresco Supported Platforms umbrella but it works fine for demo porpuses and is very easy to install, configure and maintain. Since OpenDJ is a Java application you can run it in Linux, Mac or “even” Windows 😉
Lets see how how to start with OpenDJ from scratch.
To have a full control about what is happening during the LDAP authentication add next lines to your custome log configuration file like next one. If you don’t have a custom log file already you can create it:
Now reboot and try. Also you can do that easily and without reboot using JMX with console
Remember to keep watching your logs:
[bash]
tail -f tomcat/logs/catalina.out
[/bash]
When Alfresco is starting after our changes, you must see something like this:
[bash]
2013-03-07 09:46:26,175 INFO [management.subsystems.ChildApplicationContextFactory] [main] Starting ‘Authentication’ subsystem, ID: [Authentication, managed, ldap1]
2013-03-07 09:46:26,212 WARN [authentication.ldap.LDAPInitialDirContextFactoryImpl] [main] LDAP server supports anonymous bind ldap://localhost:1389
2013-03-07 09:46:26,234 INFO [authentication.ldap.LDAPInitialDirContextFactoryImpl] [main] LDAP server does not support simple string user ids and invalid credentials at ldap://localhost:1389
2013-03-07 09:46:26,235 INFO [authentication.ldap.LDAPInitialDirContextFactoryImpl] [main] LDAP server does not fall back to anonymous bind for a simple dn and password at ldap://localhost:1389
2013-03-07 09:46:26,237 INFO [authentication.ldap.LDAPInitialDirContextFactoryImpl] [main] LDAP server does not fall back to anonymous bind for known principal and invalid credentials at ldap://localhost:1389
2013-03-07 09:46:26,247 INFO [management.subsystems.ChildApplicationContextFactory] [main] Startup of ‘Authentication’ subsystem, ID: [Authentication, managed, ldap1] complete
[/bash]
And after your first login:
[bash]
2013-03-07 09:47:34,404 DEBUG [authentication.ldap.LDAPAuthenticationComponentImpl] [http-8080-5] Authenticating user "toni"
2013-03-07 09:47:34,421 DEBUG [authentication.ldap.LDAPAuthenticationComponentImpl] [http-8080-5] Setting the current user to "toni"
2013-03-07 09:47:34,422 DEBUG [authentication.ldap.LDAPAuthenticationComponentImpl] [http-8080-5] User "toni" authenticated successfully
[/bash]
Remember to change your LDAP log debug level before going live, something like INFO could be enough.
As first post for 2013 I want to share with you all this new screencast about the straightforward configuration and how it works the new version of LibreOffice with Alfresco. Note that my demo was done with Alfresco Enterprise 4.1 but this CMIS integration also should works with Alfresco Community 4.2. As you can see check-in/out and versioning with comments are already supported out-of-the-box from LibreOffice.
Also I would like to highlight the connection binding URL “http://localhost:8080/alfresco/cmisws/RepositoryService?wsdl” that is automatically filled by LibreOffice at configuration time, this URL is the new CMIS Web Services binding address for Alfresco 4.
Appendix:
Alfresco 4 CMIS binding address (based on OpenCMIS):
CMIS Web Services Binding: WSDL Documents = http://localhost:8080/alfresco/cmisws
CMIS AtomPub Binding: AtomPub Service Document = http://localhost:8080/alfresco/cmisatom
Alfresco 3 CMIS binding address (based on Apache CXF, obsolete/deprecated)
CMIS Web Services Binding: WSDL Documents = http://localhost:8080/alfresco/cmis
CMIS AtomPub Binding: AtomPub Service Document = http://localhost:8080/alfresco/service/cmis